Dessert

Pumpkin Spice Magic Bars

img_5969

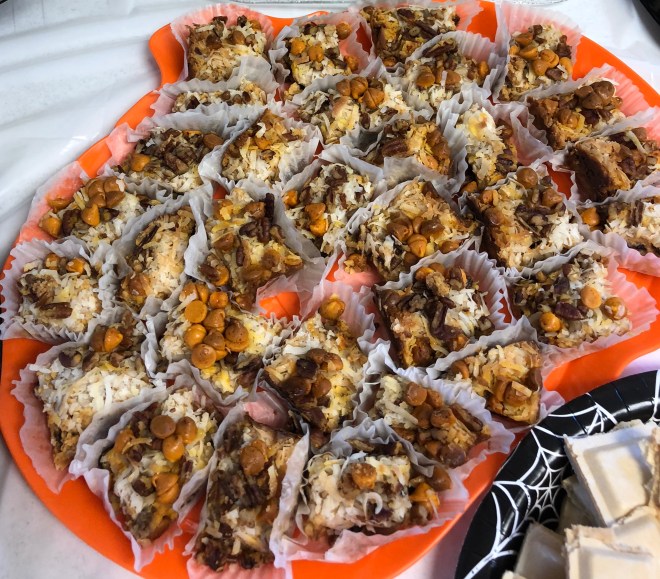
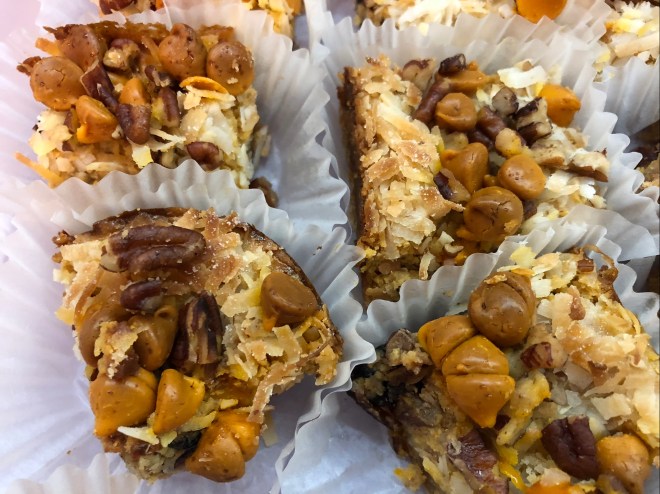
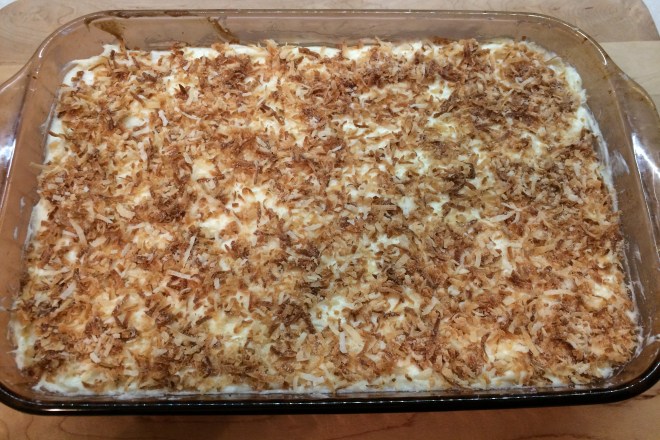
It’s been a while since I posted but I’m back! I made this recipe for our Halloween Party at my new job. (Ok it’s not so new anymore) Everyone knows how much I LOVE to dress up (NOT!) so instead I made a dessert. Normally dessert is not my go to recipe realm but I keep trying! Never give up! Anyway…. I found this recipe on Taste of Home. It was originally called Pumpkin Delight Magic Bars. After reading the reviews I decided it would be a good choice. Though as the reviews do state, the toppings do tend to fall off a bit after it’s baked. Not a big deal but even when I was determined to ‘fix’ that by making sure I pressed the toppings into the cake before baking, it did no good. Oh well! I think the next time I make it I may put some of the topping inside instead. Either way, this recipe came out amazing! I didn’t have any leftovers at work! Score for the newbie! The recipe says it makes 24 bars. I thought they might be too big so I cut them in half and got 48 small bars. Worked out great. But what to do about keeping the topping under control? I put each bar into a cupcake liner! This way it kept everything neat! Easier to transport and display as well.


I kept the recipe the same except instead of the 1 cup of white baking chips it called for I used 1 cup of pumpkin spice chips. AMAZING! So experiment with different flavors! I think for Christmas I will use cinnamon morsels and maybe throw some toffee bits on as well! Can’t hurt right! And yes even though I am doing WW again, and yes these are many points I did eat a few. How could I not? And I definitely recommend keeping them in the refrigerator if you’re not going to devour them at one sitting. Chilled is definitely better! They will not disappoint! Moist, sweet, nutty, rich bites of heaven…

img_5960


INGREDIENTS: 

  • 1 package vanilla wafer cookies (11 ounces)
  • ½ cup butter, melted (1 stick)
  • 4 ounces cream cheese, softened (½ a brick)
  • 1 can (14 oz.) sweetened condensed milk
  • ½ teaspoon pumpkin pie spice
  • 1 can (15 oz.) solid-pack pumpkin (NOT Pumpkin Pie filling)
  • 1 cup dried cranberries
  • 1 ½ cups sweetened shredded coconut
  • 1 cup pumpkin spice baking chips (or white if you choose)
  • 1 cup chopped pecans

DIRECTIONS:

  1. Preheat oven to 350ºF.  Great a 13×9 inch baking pan.
  2. Place the vanilla wafer cookies in a food processor* and pulse until coarse crumbs form. 
  3. Drizzle in the melted butter and pulse until blended. Press into the bottom of the baking pan.
  4. In a large bowl, beat the cream cheese, sweetened condensed milk and pumpkin pie spice until smooth. Beat in the pumpkin. Stir in cranberries.
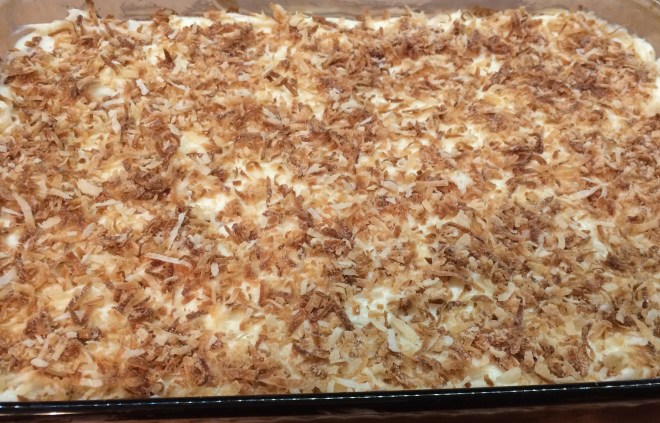
  5. Pour over crust. Layer the coconut, baking chips and pecans.
  6. Bake 45-55 minutes (it took my oven 45 minutes) or until golden brown. Cook in pan on a wire rack for 10 minutes
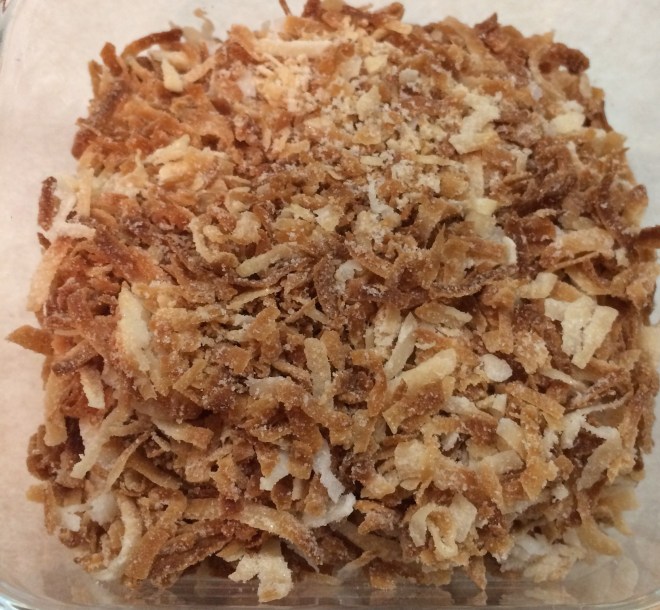
  7. Loosen the sides from pan with a knife of spatula. Cool completely. Cut into bars**and refrigerate leftovers.

* If you don’t have a food processor you can just put the cookies in a large Ziploc type bag and smash them until they are crumbs. 

** I recommend cooling completely in the refrigerator and then cutting them. Makes it easier to cut.

NUTRITION FACTS: (like we really care at this point)

1 bar: 299 calories, 17g fat (8g saturated fat), 25mg cholesterol, 144mg sodium, 35mg carbohydrates (28g sugar, 2g fiber), 4g protein.

Makes 24 bars (or 48 if you cut them in half)


Pina Colada Cake

Pina Colada Cake

I BAKED!! I know what you’re all saying…(But you don’t bake!) But I tried yet again, I refuse to give in on this. And it’s not really from scratch, it’s semi-homemade. I added my own touches and it worked! It came out amazing! So moist, rich and tropical! Oh and I even made the frosting from scratch! It was so easy! Go figure!

Rum/Vanilla Frosting

I had this cake mix in my cabinet for months, I bought it online for like a dollar and it was past it’s “best if used by date” by a few weeks so I figured I’d be adventurous. Originally I was going to make cupcakes but I thought I better just stick with a sheet cake this time. I toasted up some sweetened coconut flakes I had in the pantry also (they came out a little darker than I wanted but they taste great so all is well), and topped the cake with them.

Toasted coconut

Toasted Coconut

After tasting a small piece I wanted to eat the whole cake! WOW! Success!! I can bake I can bake I can bake!!!!


So without anymore self-praise here is how I did it.

Cake Ingredients:

1 box pineapple cake mix (I used Pillsbury Moist Supreme Pineapple)

1 (8 oz) can crushed pineapple in juice, undrained (I used about 8 ounces of fresh crushed pineapple I had in the freezer and thawed)

1/2 cup butter, melted (1 stick)

1/4 cup coconut syrup (or you can just use water or even coconut water)

3 large eggs

1/2 teaspoon rum extract

Frosting Ingredients:

2 cups confectioners sugar

4 oz butter (1 stick), softened

4 oz. cream cheese, softened

1 teaspoon rum extract

1/2 teaspoon vanilla extract

Extra Ingredients:

1/2-3/4 cup sweetened coconut flakes

Cake Directions:

  1. Heat oven to 350°F. Grease bottom of 13 x 9 pan with cooking spray or butter with a dusting of flour.
  2. Beat cake mix, pineapple, butter, coconut syrup and eggs in a large bowl with mixer on medium speed for 2 minutes. (didn’t realize how long 2 minutes can be when you’re timing something!)
  3. Pour batter into prepared pan.
  4. Bake for 34-38 minutes. (Check after 30 minutes as all ovens can be different. I took mine out at 32 minutes)IMG_5193
  5. Let cool completely before frosting.
  6. Once cool, frost the cake.

Frosting Directions: (this recipe will frost the entire cake)

  1. In a large bowl beat(cream) the butter and cream cheese.
  2. With the mixer on low-speed add the sugar a little at a time until smooth and creamy.
  3. Add the extracts.

Toasted Coconut Directions:

Place the coconut on a cookie sheet in a 350°F oven for about 2-5 minutes. Check after 2 minutes so it doesn’t burn. It goes quick once it starts to toast. Cool before putting on cake.

Pina Colada Sheet Cake


No-Bake Cannoli Pie

cannolie pie

Everyone who knows me knows I don’t bake. Or I should say, I don’t bake very well. So when I saw this recipe one day for a NO BAKE pie I was determined. I had bought a few containers of Marscapone cheese that I had been making a cannoli dip with and their “best by” dates were coming up soon so I was very happy when I found this recipe. Plus I had all of the ingredients! Well sort of anyway. The crust calls for ground-up cannoli shells. I had a box of sugar cones that we used as dippers when I made the dip so I thought, why not use them instead! And I added some almonds to the mix as well.

I brought the pie to a friend for dessert and it was a hit. Tasted like cannoli!  So how can that be a bad thing! I would definitely make this again. The original recipe, No Bake Cannoli Cheesecake had the ingredients being put into 4 mini tart pans (4″). I don’t have mini tart pans because I don’t bake! But I do have many pie dishes so that is what I used. 

INGREDIENTS:

  • 8 cannoli shells ground fine (or 8 sugar cones ground fine)
  • handful whole almonds ground fine with the cannoli shells/cones
  • 4 tablespoons butter, melted
  • 15 oz. whole milk ricotta
  • 8 oz. Marscapone cheese
  • 1 teaspoon vanilla extract
  • 2/3 cup powdered sugar
  • ½ cup mini chocolate chips
  • 1/8 cup chopped pistachios
  • Fresh whipped cream, Cool Whip or Reddi-Wip

INSTRUCTIONS:

  1. In a small bowl combine the shells/cones/almonds and the melted butter until mixed. Press firmly into bottom and on sides of pie plate. Freeze about 30 minutes.
  2. In a medium bowl cream the Marscapone and ricotta cheese. Add in the vanilla and powdered sugar, mix well.
  3. Add the chocolate chips and stir in by hand.
  4. Get the pie plate out of the freezer and carefully fill with the mixture.
  5. If using whipped cream you can decorate the edges, otherwise, add the cool whip etc. when serving.
  6. Sprinkle the pistachio nuts over the top.
  7. Refrigerate at least 3 hours or overnight. 


cannoli pie


It’s Not Just For Christmas Fudge

(I am reposting this from a few years ago, still LOVE this fudge!)

I used to make this recipe for fudge quite a bit for the holidays when I worked at WLNY in New York. I remember CJ asking for it quite a bit! It’s simple and pretty fool-proof. I could eat the whole pan if it were left in my vicinity! Fudge is good any time of year not just for the holidays so make a batch today and take a break from the diet. If you are allergic to nuts, leave them out. Have fun!

INGREDIENTS:

3 (6 oz.) packages semi-sweet chocolate chips

1 (14 oz.) can sweetened condensed milk

1½ teaspoons vanilla extract

pinch of salt

1 cup chopped walnuts (or other favorite nuts)

DIRECTIONS:

1. Line an 8″ square baking pan with waxed paper or aluminum foil.

2. In a heavy two-quart saucepan, combine chocolate chips, condensed milk, and salt.

3. Cook over low heat until chips melt. Remove from heat. Stir in nuts and vanilla.

4. Spread mixture evenly into lined pan. Refrigerate for two hours or until firm. Cut into squares and enjoy!

Makes 36 pieces

Strufoli (Italian honey balls)

 This is a reposting of a previous blog from last year! Still a timeless treat no matter what the holiday is, and this time it’s for Easter! So give them a try! They are not hard to make, honest!!

This is a recipe that my grandmother (Nana) used to make for us years ago, usually around Easter. Though they are good at any time of the year for any occasion. The first time I made these it took me forever to roll each little ball. Then I talked to my Italian Aunt Rosie about making them and she laughed when I told her I rolled each little ball individually. She said that took way too long! She told me to roll the dough into long strips like giant pretzel rods and just cut them! Simple! These little honey balls are really good and bring back so many childhood memories. They stay fresh for a very long time and you can even freeze them for another time! (Without the honey of course!) They really are simple to make and always a hit.

Strufoli (Honey Balls)

INGREDIENTS:

4 eggs

¼ cup sugar

1 teaspoon vanilla

1 teaspoon cinnamon

1 tablespoon butter

2½ cups flour

½ cup honey

vegetable oil

colored nonpareil (confetti)

DIRECTIONS:

1. In a large bowl, mix together eggs, vanilla, cinnamon, sugar, and butter. Add flour, 1 cup at a time. The last ½ cup of flour can be added if necessary to make a smooth dough. Let dough stay in bowl, covered with a dish, for ½ hour.

2. Roll out portions of dough. Cut dough into strips, rounded like pretzels, then cut into ½-inch pieces.

3. Heat about 2½ inches of oil in the bottom of a pan or deep fryer. Fry the pieces of dough, a handful at a time. If you can do this in a frying basket, it will be easier to take them out. Place pieces on paper towels to drain.

4. Heat honey until just under the boiling point. Place strufoli in a bowl and drizzle honey over them, gently tossing. Arrange on a large platter and sprinkle with the nonpareil (confetti). You can shape into a mound on a large flat dish or into a wreath.


Makes about 150 little strufoli

Tropical Pudding Shots

Yes pudding shots! I know you’ve all heard of jello shots. I also think it’s time for me to serve them at my next party. But pudding shots are almost the same but with pudding! This recipe calls for sugar-free fat-free pudding but if you’re not watching calories just use the regular pudding. I actually have not made them yet but I plan to soon! They sound delicious! This recipe also only makes 8 servings so if you have a huge crowd  adjust the amounts accordingly. And since I am allergic to the aspartame in the sugar-free jello puddings (and jello) I will have to find one with Splenda or just use the regular kind. Have fun and enjoy the weekend!

INGREDIENTS:

4 ounces fat-free milk (I will probably use fat-free half-and-half)

1 small (4 serving) package Jell-O Sugar Free Fat Free Instant Vanilla Pudding Mix (or any other kind you want)

3 ounces coconut rum

1 ounce lime juice

½ cup canned crushed pineapple in juice, not drained

1 cup Cool Whip Free, thawed (or regular if you wish)

DIRECTIONS:

1. Combine milk and pudding in a bowl and whisk or mix until smooth. Add the rum, lime juice and pineapple. Stir well.

2. Fold in the Cool Whip. Once mixture is smooth throughout, divide it among 8 small cups.

3. Place in fridge until ready to serve, at least 30 minutes. Use a spoon to eat!

Makes 8 servings

Pumpkin Carrot Bars

Yes I am still in Fall mode. Trying to pretend it’s cooler outside and that the leaves are changing here. But then I look outside and see nothing but green palm trees, green leaves on the maple trees, green everywhere! Ok, so the leaves really don’t change here. They do fall on some trees but they aren’t pretty about it. Oh well, the sacrifice for living in the Sunshine State. Maybe they change in northern Florida? And right now the temperature is still 79 degrees. It’s 7pm! But I did buy a couple little pumpkins at Walmart yesterday! I will use them for pies or something later in the year. They actually last a long time after the fall! I’ve had pumpkins that lasted till April!

Well I found this recipe and changed it a bit to make it a little less fattening. I substituted Splenda and Splenda Brown Sugar Blend for the sugars and I use light cream cheese in place of regular. As always, feel free to use the real stuff if you want. I was also very happy to hear that the pumpkin shortage is officially over as well. Last year I had stocked up on the canned pumpkin when I found it. It was like gold! But the crop was good this year and we can all breathe easily now! Whew!

INGREDIENTS:

2 cups flour or whole wheat flour

1 tablespoon pumpkin pie spice

2 teaspoons baking powder

1 teaspoon baking soda

1 cup granulated Splenda (sucralose)

1/3 cup light butter/margarine, softened

½ cup Splenda Brown Sugar Blend

2 eggs

2 large egg whites

1 can (15 ounce) pumpkin

1 cup carrot, finely shredded

Cream Cheese Topping/Icing:

4 ounces light cream cheese, softened

¼ cup Splenda

1 tablespoon fat-free half-and-half (or whatever milk product you want)

DIRECTIONS:

1. Preheat oven to 350º.  Grease a 15 x 10 jelly roll pan. (or similar pan)

2. In a small bowl combine flour, pumpkin pie spice, baking powder and baking soda.

3. In a larger bowl, beat together sugar (1 cup), butter and brown sugar until crumbly. Add eggs, egg whites, canned pumpkin and carrots. Beat until well blended. Add flour mixture and mix until well blended. Spread into greased pan.

4. Mix together cream cheese, sugar (¼ cup) and milk until thoroughly blended.

5. Drop teaspoonfuls of topping over pumpkin batter and swirl mixture with a butter knife.

6. Bake for 25-30 minutes or until toothpick or cake tester comes out clean. Cool in pan completely on wire rack before cutting into squares.

Makes 48 squares.

Skinny Key Lime Pie

Key Lime Pie is my favorite pie. But I could do without all the extra calories in it. This recipe is lower in calories and fat but still tastes great. If you don’t care about your calories/fat use the regular versions of the ingredients. Key Lime Pie also should NOT be bright lime green in color! It should be an almost pale yellow to very faint green. All those other pies that glow in the dark have food coloring added. You don’t need it! Honest! This recipe is also very easy to make and takes more time to chill and set than it does to prepare and bake. If you are ever in Key West though, try their frozen chocolate covered key lime pie on a stick! OMG! Talk about sugar coma! But it is so incredibly delicious and  heavenly. The last time I had it I shared it with my husband and stepson and we had a hard time finishing it. So worth the extra calories and fat every so often!

INGREDIENTS:

2 large eggs

2 large egg whites

½ cup Key Lime juice (such as Nellie & Joe’s Famous Key West Lime Juice)

1 teaspoon lime zest (if you can find a key lime use that instead)

1 (14 ounce) can fat-free sweetened condensed milk

1 (6 ounce) reduced-fat graham cracker crust

1½ cups frozen reduced-calorie whipped topping, thawed

DIRECTIONS:

1. Preheat oven to 350º.

2. Beat eggs and egg whites at medium speed on an electric mixer until well-blended.

3. Gradually add the lime juice, zest and condensed milk into the egg mixture, beating until well-blended.

4. Spoon mixture into pie crust and bake at 350º for 20 minutes or until almost set. (The center will not be firm but will set up as it chills.)

5. Cool on a wire rack. Cover loosely and chill for at least 4 hours. Spread whipped topping evenly over filling. Serve!

Makes 8 servings


Chocolate Mousse Bars

All you chocolate hounds out there this one is for you! Chocolate Mousse is always seen as such a decadent dessert and it usually is but my recipe will use the sugar substitute sucralose (Splenda). Sucralose is one of the few substitutes that you can use exactly as you would sugar. It may even be sweeter! I can only use sucralose because aspartame gives me migraines. So no “Blue” in my house! Only “yellow”!  Aspartame can’t stand up to the heat of baking either so that is another reason to use sucralose. If you are really weird about using ‘fake’ sugar by all means use the real stuff. I will never know! And I won’t think any less of you! But if you use the sucralose and are counting points for  Weight Watchers for any reason, the bars are only 4 points each and regular sugar makes them 5 points each. Not much of a difference so it’s up to you!

Photo is for illustrative purposes only!

INGREDIENTS:

6 extra-large egg whites

1¼ cup sugar or sugar substitute

1 tablespoon canola oil

1½ cups unsweetened baking chocolate, melted

1/3 cup unsweetened cocoa powder

¾ cup all-purpose flour

1½ cups nonfat plain yogurt

1 teaspoon vanilla

DIRECTIONS:

1. Heat the oven to 350º. Spray an 8″ square baking pan with cooking spray.

2. In a large mixing bowl whip the egg whites until frothy. Gradually add the sugar and beat until fluffy.  Meanwhile, stir the oil into the melted chocolate. Add this mixture to the egg whites and blend.

3. With a mixer on low, sift in the flour and cocoa powder and fold together. Beat until fluffy. Add the yogurt and vanilla; beat until uniformly combined.

4. Scrape the batter into the pan; smooth the top. Bake until the batter feels firm to the touch in the center, but a toothpick comes out coated with the batter, about 30-35 minutes.

5. Remove the pan to a wire rack to cool to room temperature. Cover with plastic wrap and chill until firm, at least 1 hour.

Makes 16 bars

Mini Upside-Down Key Lime Pies

Key Lime Pie is one of my all time favorite pies. If I splurge and get dessert when we’re out for dinner and Key Lime Pie is on the menu I can’t resist. (Unless there’s crème brûlée or tiramisu also!) But with the crust and sugar and rest of the high calorie ingredients I am always hesitant to order it. This recipe makes 5 little “pies” so it’s portion controlled and using lighter ingredients helps me stay in control. The recipe calls for sugar-free Jell-O, this can be an issue for me. Jell-O uses aspartame in their sugar-free product and I am allergic to it. I get intense migraines from even a little bit. So unless I find a sugar-free gelatin with sucralose in it I will probably use the full sugar version on the Jell-O.

For illustrative purposes only!

INGREDIENTS:

1 4-serving package (or half an 8-serving package) Jell-O Sugar-Free Lime Gelatin dessert mix

1 no-calorie sweetener packet (Splenda)

1½ tablespoons lemon juice

¼ teaspoon vanilla extract

2 cups Cool Whip Free, thawed

2 sheets (8 crackers) low-fat honey graham crackers, lightly crushed

DIRECTIONS:

1. In a medium bowl, combine 1 cup boiling water with gelatin mix and sweetener. Stir for at least 2 minutes, until completely dissolved.

2. Mix in lemon juice, vanilla extract, and ½ cup cold water. Refrigerate for about 45 minutes, until slightly thickened but still mixable.

3. Stir in the Cool Whip. Whisk until completely blended. Divide mixture among 5 small bowls. Refrigerate until firm, at least 3 hours.

4. Once ready to serve, evenly distribute crushed graham crackers over the pies.

Makes 5 servings

Per pie: 83 calories, 1g fat, 15g carbs, 5g sugar, 1g protein, <.5g fiber

1 2 4
Cruise Ship Recipes at Home

How do I Make That?

Rachael Ray

It's Not Just Popcorn!

Joanne Eats Well With Others

It's Not Just Popcorn!

Garlic Girl

It's Not Just Popcorn!

BuzzFeed - Tasty

It's Not Just Popcorn!

An Edible Mosaic™

It's Not Just Popcorn!

StephenKing.com - Latest News

It's Not Just Popcorn!

Food52

It's Not Just Popcorn!

Big Bear's Wife

It's Not Just Popcorn!

The Weekend Gourmet

It's Not Just Popcorn!

Skinnytaste

It's Not Just Popcorn!

What's Cooking at the Genua's?

It's Not Just Popcorn!

Simply Recipes

It's Not Just Popcorn!

It's Not Just Popcorn!

Homemade In The Kitchen

Small Batch Recipes and Recipes For Two

overdeepblueseas

OVER DEEP BLUE SEAS BLOG @ WordPress.com

Sluggo's Escapades

What's Sluggo up to today?

RavieNomNoms

A Girl, Her Blog, and Lots of Food Pictures!