Tag Archives: low calorie

Zucchini Chicken Enchiladas

This slideshow requires JavaScript.

I made this recipe last night for dinner for the first time. I LOVED it! It made quite a bit too. I think I got about 15-17 pieces. I found this recipe on Facebook Zucchini Enchiladas. I, of course, changed it up a bit to what I found worked better for me.

One of the toughest parts of the recipe was slicing the zucchini into the thin slices needed. I had a small Y-shaped peeler but it was too small. So I improvised and used my Pampered Chef cheese slicer and it worked great! Though I have to say it was tedious. The original recipe called for 4 large zucchini, I had 3 and it worked fine. I also didn’t have quite enough enchilada sauce so I took a small can of green chilis and added it to the amount of sauce I was supposed to add to the top of the enchiladas and pureed it. Worked just fine and tasted great.

I thought this was a great change from the carb-loaded tortillas. Don’t get me wrong, I love my tortillas but this was a nice variation. I have lots left over for lunch and I froze the rest for another day.

INGREDIENTS:

  • 1 tbsp extra-virgin olive oil
  • 1 large onion, chopped (I used a sweet onion)
  • kosher salt
  • 2-4 cloves garlic, minced (yes I used 4 of course)
  • 2 tsp. ground cumin
  • 2 tsp. chili powder
  • small can green chilis
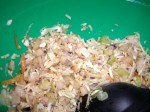
  • 3 cups shredded cooked chicken (I used 3 large boneless breasts)
  • 1 1/3 cup red enchilada sauce
  • 3-4 large zucchini, halved lengthwise
  • 1 cup shredded Monterey jack cheese
  • 1 cup shredded cheddar cheese
  • sour cream for topping
  • fresh cilantro for garnish

DIRECTIONS:

  1. Preheat oven to 350°F. In a large skillet heat oil over medium heat.
  2. Add the chopped onion and season with salt. Cook for about 5 minutes or until soft.
  3. Add the garlic, cumin and chili powder and stir until all combined.
  4. Add the chicken and 1 cup of the enchilada sauce, mixing until well combined. It should be a little saucy.
  5. Puree the small can of green chilis with the remaining enchilada sauce and set aside.
  6. On a cutting board use a Y-shaped vegetable peeler if you have one wide enough for the zucchini. Slice very thin.
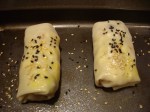
  7. Layout 3 slices, overlapping slightly and add a spoonful of the chicken mixture (about 1/4-1/3 cup) at the top. Carefully roll and place into a casserole dish, seam side down. Repeat till finished. (I used two casserole dishes)
  8. Spoon the green chili/enchilada sauce mixture over the enchiladas and sprinkle with the cheese.
  9. Bake until cheese is melted, about 20-30 minutes.
  10. Garnish with fresh cilantro and sour cream. Careful they are very hot because of the water content in the zucchini.
  11. ENJOY!

Refreshing Cucumber Salsa

2015-06-07 12.38.50

I received this recipe in my email this weekend and just had to try it out. It was originally from a Taste of Home reader from North Dakota (Crisp Cucumber Salsa) and the only thing I changed was the type of cucumber. I used the english/hothouse cucumber and didn’t peel it. The original recipe called for peeling the cucumber, which I would only do if I used a regular variety. The english style holds up better and stays firmer.

I made the recipe for a couple of friends and it was a huge success. So easy and healthy as well! The original recipe called for serving immediately but I think letting it chill for a bit would be better. I will definitely be making this quite a bit this summer!

A refreshing, light, crunchy salsa/relish. It would easily go on burgers, hot dogs, chicken or fish as well! I might even try using greek yogurt instead of the sour cream next time! If anyone tries it that way let me know!

Ingredients:

2 cups finely chopped, seeded cucumber (I used english cucumber)

1/2 cup finely chopped seeded tomato (1 medium plum tomato)

1/4 cup chopped red onion

2 TBS minced fresh parsley

1 jalapeño pepper, seeded and chopped

4-1/2 tsp minced fresh cilantro

1 clove garlic, minced

1/4 cup light sour cream

1-1/2 tsp lemon juice

1-1/2 tsp lime juice

1/4 tsp ground cumin

1/4 tsp seasoned salt

Baked tortilla chip scoops

Instructions:

1: In a medium bowl, combine the cucumber, tomato, red onion, parsley, jalapeño pepper, cilantro and garlic.

2: in a small bowl add the sour cream, lemon juice, lime juice, cumin and seasoned salt.

3: Pour creamy mixture over the cucumber mixture and mix gently. Coating all ingredients.

4: It can be served immediately but is better chilled for about 15-30 minutes before serving. Stir before serving.

Calories: 16 per 1/4 cup (without chips)

Fat: 1g

Sodium: 44mg

Carbs: 2g

Protein: 1g

Easy Cranberry Sauce

I was never one to eat the canned, gelatinous cranberry sauce. Thought it was nasty. Still do actually. Especially with all that sugar in it!! So I searched my recipes and came up with a combination of a few. It’s very simple, really. I had bought a few bags of fresh cranberries before Thanksgiving because they were on sale and couldn’t pass up the BOGO special. I have another bag left and I think I’ll make another batch to freeze. 

Last night I made my Thanksgiving Bundles and we had no sauce so I made this recipe. So easy and so tasty! Oh and revisit my  Thanksgiving Bundles post as I updated the photos. 

INGREDIENTS:

1 bag fresh cranberries

1 cup water

1 cup Splenda (or other sucralose sweetener)

1 teaspoon fresh orange zest

1 small apple (any kind) peeled and finely chopped

1 cinnamon stick

DIRECTIONS:

  1. Add the water and Splenda to a medium pot. Bring to a boil.
  2. Add the cranberries and orange zest. Stir and bring to a boil again.
  3. Lower heat to simmer and add the apple and cinnamon stick.
  4. Simmer, covered, for 10-15 minutes stirring occasionally. Remove the cinnamon stick.
  5. I used a potato masher and just broke up some of the cranberries and apple pieces but you don’t have to do this.
  6. Remove from heat and cool. Chill a few hours before using, unless you like it warm!

That’s it! Simple. Just be careful when the cranberries start to pop. The splatter can be hot!

Shrimp Egg Rolls

Today is all about me venturing into the realm of the large wonton wrappers! Yes I have now graduated from the small ones to the big ones! I have to admit, I was a little scared of not rolling them right, or having the filling ooze all over the place. But my fears were for naught!

 I had seen this recipe on an episode of Hungry Girl and I figured it looked easy enough so I tried it! They were such a success I made them two nights in a row for dinner! Yes, they are usually an appetizer but who says they have to be? Now this recipe calls for scallions and bean sprouts. I was out of both of them so I left them out in this batch. Still came out awesome! The best part of this recipe is that they are baked, not fried! Saves a ton of calories (each roll is about 100 calories) and they still come out crispy and yummy! 

I ended up using the whole package in two days so I have to restock my supply of large wrappers. Remember you can find them in the produce department in the Asian section. Even Walmart’s produce section has them! They are so easy to make and you can substitute anything you want in them. Not a fan of shrimp? Use chopped cooked chicken or chopped cooked pork. These are great for getting rid of leftovers in the refrigerator! Just make them into an egg roll!

I doubled the original recipe (it was an accident actually so I made it work) therefore, this makes a lot of filling. I got about 20 egg rolls out of it. No leftovers!

INGREDIENTS:

1 bag coleslaw mix (12-16 oz.)

8 oz. cooked and chopped shrimp

1 can sliced water chestnuts, drained and chopped

½ cup bean sprouts, chopped

4 scallions, chopped (green and white parts)

2 stalks celery, thinly sliced widthwise

3-4 tablespoons reduced-sodium or lite soy sauce

2 teaspoons crushed garlic (I used 4 cloves)

½ teaspoon ground ginger

¼ teaspoon salt

Several dashes black pepper

sesame seeds, optional

20 large square egg roll/wonton wrappers

Sauces for dipping

DIRECTIONS:

  1. Preheat oven to 375ºF.
  2. Put slaw mix into a large microwave-safe bowl with 4 tablespoons of water. Cover and microwave on HIGH for 2 minutes. Drain any excess water. Add the rest of the ingredients (except for the wrappers of course). Mix well and set aside. You can set it in the fridge to marinate for about 20 minutes for a better flavor.
  3. Using a large baking sheet spray lightly with nonstick cooking spray. Set aside.
  4. Using a clean, dry surface place a wonton wrapper. Evenly distribute about ½ cup of the mixture onto the wrapper, just below center, in a row.
  5. Moisten all four edges of the wrapper by dabbing your fingers in water and running them around the edges smoothly. This will help the wrappers stick better.
  6. Fold the sides of the wrapper about 3/4 inch towards the center. This keeps the mixture from falling out of the sides. Next, roll the bottom of each wrapper up around the mixture and continue rolling until you reach the top. Seal the outside edge with another dab of water. Go slow at first till you get the hang of it. It’s actually pretty easy.
  7. Carefully transfer to prepared baking sheet. Repeat until you have made enough rolls. Keep the surface you are working on, dry and clean.
  8. Spray the tops of the egg rolls with nonstick cooking spray. Sprinkle with sesame seeds if you wish.
  9. Bake in the oven for 25-30 minutes, until golden brown. I baked for 30 minutes. Allow to cool slightly and serve!

Be very careful as they will be extremely HOT! We cut them in half to let steam out before eating. I also made my own sauce using Mikoto ginger dressing and some soy sauce. Delish! Enjoy!

Cheesy Zucchini Soup

Last night I made a wonderful delicious soup for the first time. I want to thank fellow blogger Reeni for the inspiration. She posted the original recipe on her blog Cinnamon Spice & Everything Nice and I just had to make it myself. I did change it a bit because I didn’t have the exact ingredients on hand. It still came out incredibly delicious. I was sweating like crazy making this last night, it is Florida and still 80 degrees or so right now, but I kept at it. The recipe is pretty easy, but it does take time cutting up all the stuff. Oh how I wish I had a sous chef of my own to do all that for me!

The original recipe I had called for vegetable broth. I had chicken broth and beef broth. I used chicken broth. It also called for a carrot. Didn’t have any, so didn’t use it. The recipe also called for ¾ cup grated Parmesan cheese OR 1 cup of shredded cheddar, swiss or pepper jack. I couldn’t decide so I used ½ cup Parmesan cheese and ½ cup shredded cheddar! Same thing with the herbs. It originally called for 1 teaspoon dried thyme or basil. I used ½ teaspoon of each. And the one final change or should I say suggestion that I left out was adding ½ cup of half-and-half or heavy cream. The soup didn’t need it and I didn’t need the extra calories! I’d say the recipe makes about 6 nice servings. I had two bowls and my husband had three! There is even enough for another bowl left over! So it’s a keeper! Please check out the original recipe on Reeni’s blog at  Cinnamon Spice & Everything Nice! Mangia!

INGREDIENTS:

Olive Oil, about 3 tablespoons

1 large Vidalia or yellow onion, diced (I used Vidalia)

1 large carrot, diced

1 stalk celery, diced

4-6 cloves garlic, (I used at least 6

½ teaspoon dried basil

½ teaspoon dried thyme

salt and pepper to taste

2 large zucchini (I used 1 large and 2 small)

3 cups vegetable or chicken broth

½ cup grated Parmesan cheese

½ cup shredded cheddar, swiss, pepper jack or any other cheese of your choice

½ cup half-and-half or heavy cream, optional

DIRECTIONS:

  1. In a large saucepan heat the olive oil over medium-low heat. Add the onion, carrot and celery, sauté until tender, about 5-10 minutes. (I cooked it for 10 minutes) Stir often. Add the garlic and sauté until you smell its wonderful aroma.

  2. Add the thyme and basil. Season well with salt and pepper.

  3. Meanwhile peel and dice 1½ of the zucchini (I used 2½). It should be about 5 coups. Shred the rest of the zucchini on the large holes of a grater and set aside.

  4. Add the diced zucchini to the pan and mix well, cooking for about 3-4 minutes. Add the broth and bring to a simmer for 15 minutes.

  5. Turn off the heat and purée the soup using an immersion blender. Careful of hot splatters with this! If you don’t have one carefully transfer the soup in batches to a blender and purée in batches. Return to pan if you used this method.

  6. Once the soup is pureed add the shredded zucchini and the cheese. (You can add the half-and-half here if you wish) Stir well.

  7. Simmer for 5-10 minutes, stirring occasionally.

Makes 4-6 servings

Best Garlic Smashed Cauliflower, Ever!

So I have been totally slacking in my blogging duties. I apologize. I have many recipes to add and I’m going to start with this one. I love mashed potatoes. My favorite veggie of all time. But what I don’t love is the calories that go with it. For a while I have seen a few recipes from different sources that combine a potato and cauliflower. I know I’ve posted a recipe for my smashed cauliflower before but this one blows it away! I’m not kidding. The majority of the recipe is cauliflower which is low-calorie and good for you. But you will swear there is no cauliflower in this when you taste it. OMG! Oh and it has a bunch of garlic in it too! I made this last night as a side for our pork chops. I was so excited that I forgot to take a picture of it before we demolished it. The recipe makes 4 servings and the picture I have here is what was left. Needless to say I will most definitely be making this again, soon! One of the recipes I found used buttermilk but I didn’t have any so I used fat-free half-and-half. You can definitely use buttermilk or regular half-and-half, whatever you wish. But the great thing about this is that there is about 100 calories per serving! I know! So without further ado here is the recipe I came up with.

(See I told you there wasn’t much left!)

INGREDIENTS:

1 large potato, peeled and cut into small cubes

4 cups cauliflower florets, washed (a small head is probably fine)

¼ cup milk of your choice (buttermilk, half-and-half, regular milk…)

2 tablespoons butter substitute (I use I Can’t Believe it’s Not Butter, light)

 6 cloves garlic, peeled

salt and pepper to taste (I did find that it does need salt so you may even want to add some to the water)

DIRECTIONS:

  1. Place the cauliflower, potato and garlic into a pot large enough to hold it all. Cover with water and bring to a boil.
  2. When it boils, lower the heat to a simmer and continue cooking for about 15-20 minutes. Making sure the cauliflower is very tender and soft.
  3. Drain and return to pot. Add the milk and butter. 
  4. Using a hand mixer or potato masher, mash till smooth! Add salt and pepper as needed.

Serve and be ready to be amazed! Makes 4 servings or 2 very large ones! 

Cauliflower au Gratin w/Panko Crusted Flounder

Today’s post I have to give props to Biz at My Bizzy Kitchen. (see the original recipe at My Bizzy Kitchen)The cauliflower au gratin part of the recipe is from her blog and it is so good I had to rave about it today. I had to make a few changes to the recipe only because I didn’t have all the exact ingredients. Original recipe called for skim milk, I didn’t have any so I used fat-free half-and-half; original recipe had mozzarella cheese and blue cheese, I used swiss and gorgonzola, which I had. It still came out great. I also didn’t cook the sauce long enough for it to thicken but it still came out great. There were no leftovers which is a good sign it was edible! I served it with panko crusted flounder fillets. For these I just dredged the fillets in a little soy flour, dunked in egg/milk mixture and then coated with panko bread crumbs. Just fry them in a large pan with enough oil to cover the bottom of the pan. You don’t need a ton of oil so don’t go freaking out that it’s fried. I used olive oil also. Actually the entire dish is pretty low-calorie.  Lots of protein and vitamins!

Flounder frying in very little olive oil

Cauliflower before baking

So before you look at the finished photo remember, the sauce was a bit watery! But, I also discovered that it tastes great poured over the fish as well! (no pic of that of course!) So all in all I would make this again. Very easy actually and cooked pretty fast. Oh also, the original recipe called for cooking the cauliflower first on the stove in water. I cooked mine in the microwave. Less heat since I was using the stove for the flounder and the oven was heating up for baking the cauliflower.

INGREDIENTS:

1 medium head cauliflower, washed and cut into bite size pieces

1 cup fat-free half-and-half

1 tablespoon butter (I used a butter substitute)

1 tablespoon flour (I used soy flour)

3 ounces shredded swiss cheese (You can use mozzarella, monterey jack or cheddar too)

1 ounce crumbled gorgonzola cheese (You can use blue cheese too)

1 tablespoon Italian bread crumbs (I used panko)

DIRECTIONS:

1. Place the cauliflower in a microwave safe container with about ¼ cup of water. Cover and cook on HIGH for 6-8 minutes, checking halfway through to see if it’s tender. Drain water when done. Set aside.

2. While the cauliflower is cooking melt the butter in a medium saucepan. Stir in the flour and cook on medium heat for about 1 minute. Slowly add the milk, making a white sauce, stirring constantly. (Here is where I apparently didn’t cook it long enough. You can raise the heat a bit and keep stirring until it thickens up a bit. Don’t worry if it doesn’t. It’ll still taste good.)

Cauliflower au gratin!

3. Remove saucepan from the heat and mix in the other cheeses until they all melt. The gorgonzola or blue cheese may not melt all the way but that is fine as it will continue to melt in the oven. Add the cauliflower and mix well. If it’s easier to mix the cauliflower in the casserole dish you are going to use that is fine. That’s what I did. Top with the bread crumbs and bake at 425º for 15-20 minutes. I put the broiler on for a minute or so just to brown it up a little more. The cheese should be nice and bubbly! Serve

Voila! Flounder and Cauliflower au Gratin!

Makes about 4 servings.

Parisian Green Beans

Ok I have no clue why these are called “Parisian”. Maybe because they dress up plain old frozen green beans into something fancy? I’ve never been to Paris, maybe this is how they serve them there. It could be because the French were the first ones to put green beans on their menus! No matter what the reason, this recipe is great. It’s different from your normal ho-hum green beans. As you all know I normally double or triple the garlic amounts in recipes but this one already has 3 cloves in it so I think that’s enough. It’s also got bell pepper flakes, which is something you don’t see too often in recipes. (It should be in the spice aisle). Dill weed and walnuts round out this recipe giving it that something extra. It’s a very low-calorie recipe, low carbs, and good fiber! If you have nut allergies, leave out the walnuts. My husband would also insist on putting parmesan cheese on top of these as well. Making it Italian/French! Bon appetit!

INGREDIENTS:

32 ounces frozen green beans, cooked

3 garlic cloves, minced

1 tablespoon extra-virgin olive oil

¼ cup bell pepper flakes

1 tablespoon dill weed

½ teaspoon salt

¼ cup chopped walnuts

DIRECTIONS:

1. Cook beans as directed on the package. Drain any liquid off.

2. Heat a skillet on medium with the olive oil. Add beans to skillet. Add the rest of the ingredients and cook over medium heat for about 5-7 minutes.

Makes 6 cups


Skinny Key Lime Pie

Key Lime Pie is my favorite pie. But I could do without all the extra calories in it. This recipe is lower in calories and fat but still tastes great. If you don’t care about your calories/fat use the regular versions of the ingredients. Key Lime Pie also should NOT be bright lime green in color! It should be an almost pale yellow to very faint green. All those other pies that glow in the dark have food coloring added. You don’t need it! Honest! This recipe is also very easy to make and takes more time to chill and set than it does to prepare and bake. If you are ever in Key West though, try their frozen chocolate covered key lime pie on a stick! OMG! Talk about sugar coma! But it is so incredibly delicious and  heavenly. The last time I had it I shared it with my husband and stepson and we had a hard time finishing it. So worth the extra calories and fat every so often!

INGREDIENTS:

2 large eggs

2 large egg whites

½ cup Key Lime juice (such as Nellie & Joe’s Famous Key West Lime Juice)

1 teaspoon lime zest (if you can find a key lime use that instead)

1 (14 ounce) can fat-free sweetened condensed milk

1 (6 ounce) reduced-fat graham cracker crust

1½ cups frozen reduced-calorie whipped topping, thawed

DIRECTIONS:

1. Preheat oven to 350º.

2. Beat eggs and egg whites at medium speed on an electric mixer until well-blended.

3. Gradually add the lime juice, zest and condensed milk into the egg mixture, beating until well-blended.

4. Spoon mixture into pie crust and bake at 350º for 20 minutes or until almost set. (The center will not be firm but will set up as it chills.)

5. Cool on a wire rack. Cover loosely and chill for at least 4 hours. Spread whipped topping evenly over filling. Serve!

Makes 8 servings


Red Radish Spread (updated)

It’s only been recently that I discovered I like radishes. Up until now I always thought I hated them. I really don’t know why. I don’t remember actually eating one when I was younger and deciding that it was gross. I don’t actually remember ever eating one before stating I didn’t like them. Then one day I decided to try one in my salad. Lo and behold I liked it! Go figure. So when I came across this recipe for a Red Radish Spread I thought it was a unique ingredient for a dip/spread. I am always looking for a different spread/dip to serve. We get tired of the same old onion dip, spinach dip, crab dip and so on. This recipe is also from The Queen Victoria Bed & Breakfast Inn that I mentioned in a post the other day.  There is nothing really weird in the recipe and though I haven’t actually made this yet I am going to get some radishes this weekend and give it a try.

INGREDIENTS:

8 ounces light cream cheese, softened

1 cup chopped red radish (a small bag should be good)

2 tablespoons horseradish

1 tablespoon lemon juice

½ teaspoon salt

¼ teaspoon dried dill

1 clove garlic, minced

DIRECTIONS:

Process all ingredients in a food processor. Cover and chill several hours.

Serve with crackers or veggies.

Makes 1½ cups

Ok, I made the spread. It came out delish! I know, this kind of looks like strawberries. It was very tasty though and I of course added more garlic than the recipe called for. Still great! So easy to make too. Try it!!

Cruise Ship Recipes at Home

How do I Make That?

Rachael Ray

It's Not Just Popcorn!

Joanne Eats Well With Others

It's Not Just Popcorn!

Garlic Girl

It's Not Just Popcorn!

BuzzFeed - Tasty

It's Not Just Popcorn!

An Edible Mosaic™

It's Not Just Popcorn!

StephenKing.com - Latest News

It's Not Just Popcorn!

Food52

It's Not Just Popcorn!

Big Bear's Wife

It's Not Just Popcorn!

Cinnamon Spice & Everything Nice

It's Not Just Popcorn!

The Weekend Gourmet

It's Not Just Popcorn!

Skinnytaste

It's Not Just Popcorn!

What's Cooking at the Genua's?

It's Not Just Popcorn!

Chef in Training

A great place to find easy, delicious and family friendly recipes.

Simply Recipes

It's Not Just Popcorn!

It's Not Just Popcorn!

overdeepblueseas

OVER DEEP BLUE SEAS BLOG @ WordPress.com

Sluggo's Escapades

What's Sluggo up to today?

RavieNomNoms

A Girl, Her Blog, and Lots of Food Pictures!

%d bloggers like this: